
Sam Hallas' Website
To understand why I scan documents and why I scan them the way I do, you need to know what I am trying to achieve.
I have a large number of historic documents and pieces of sheet music which are either no longer available or have only limited availability. I should like to make documents available to a wider audience and to some extent to preserve them for the future. Old sheet music is fragile and will deteriorate with continued use.
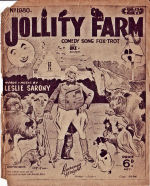
I have no desire to preserve the look and feel of documents in their original state - see music cover (left).
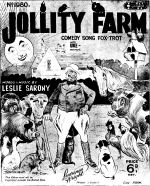
What I want to do is to preserve the content of a document to make it as usable and clear as the day it rolled off the press, as in the restored music cover (right). See my complaints about online document collections on my MIDI page and for more examples of restored sheet music.
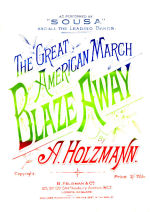
I choose the mode to suit the original. The front cover of many pieces of sheet music is in at least one colour, sometimes more. Detail is from Blaze Away by Abe Holzmann. Click the image for the full sheet music.
Some technical documents contain photographs, usually monochrome. For these I choose greyscale.
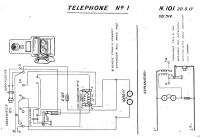
Text documents, circuit diagrams and music scores are black print only. I choose Black & White for these.
I choose a resolution that I find gives good accuracy with reasonable file sizes. I've scanned a document at four resolutions: 600 dpi, 300 dpi, 150 dpi and 75 dpi. Enlarging them so they all appear the same size, you can see the differences.
I think it's fairly clear that 600 dpi is the best, whereas 75 dpi is hardly recognisable. Bear in mind, though, that the images on screen are larger than the printed result, so the difference between 600 and 300 dpi is less noticeable. If you are not convinced, try printing this document where I've set actual type side-by-side against the scans. View it at normal reading distance of about 40 cm and it's hard to tell 600 from 300 dpi.
Next, there's the issue of file size. Every doubling of the resolution increases the uncompressed file size by a factor of four. File compression - see File Format below - can help bring the factor down to nearer two. For files that are to be available for download from a web site it makes good sense to keep the size as small as practical to reduce download time.
When I first started scanning the resolution of most home printers was only 300 dpi: there didn't seem much point in excceding that resolution. That was the final factor in my decision to standardise on 300 dpi as the optimum resolution for scanning black and white documents and diagrams. However, for photographs and coloured material, the eye is much more forgiving and I find that 150 dpi is more than adequate for most purposes.
I've saved a test page A4 in size with a fairly solid fill of typescript scanned at 300 dpi in several formats: TIF, JPG, and GIF (see right).
This is a format preferred by imaging professionals. It can be uncompressed, giving large files, or compressed, giving smaller files. The compression used in TIF files is lossless - that is no information is lost and when uncompressed it's just as good as the original.
The scanning density is stored inside the file so that it can be reproduced at original size. The colour format is retained - colour, greyscale, black & white.
The test page is 4180 kB in colour,2332 kB in greyscale, and 185 kB in B&W
This format is commonly used for pictures on web pages and storing home digital photographs. It is a lossy compression - information is discarded that is less noticeable to the eye and cannot be restored when uncompressed. Compression ratio is variable and it can make very compact files at the expense of reduced definition.
The scanning density is stored inside the file so that it can be reproduced at original size. There are only two colour formats available: full colour or 256 shades of grey.
The test page as JPG is 1071 kB in colour, 960 kB in greyscale, and 1112 kB in B&W (which is converted to greyscale)
Another format commonly used on web pages for simple images. It gives very compact files. It is a lossless compression, but has a limited range of formats.
The scanning density is not stored inside the file, so the original size is unknown. There are only three colour formats: 2 colours (black & white), 16 colours and 256 colours. However, GIF supports animation which makes it useful on the web, though not for my purposes in document scanning.
The test page as a GIF is 1536 kB in colour, 1982 kB in greyscale, and 172 kB in B&W.
If I may quote Wikipedia: "PNG is a bitmapped image format that employs lossless data compression. PNG was created to improve upon and replace GIF (see above) as an image-file format not requiring a patent license.... PNG was designed for transferring images on the Internet, not professional graphics....".
The patents on GIF have now expired and I do not find any use for the other benefits of PNG in document scanning.
It all depends on the source material, how accurately you want to reproduce the original and how big or small you want the final file to be.
For documents which are to be converted to Acrobat® format, I use TIF, in 2-colour for black and white text and line art, and the approprite setting for greyscale and colour photos. Occasionally I use TIF in 16-colour mode for coloured diagrams, which produces a smaller file size than full colour mode. For me Acrobat® generally produces smaller files from TIF sources than it does from JPG.
Document Repository